
Substack Setup: Navigation & Graphics
What's holding you back from setting up a Substack?

Substack led me ever so nicely to a placeholder post called “Coming Soon,” then I had to click on a lot of links to figure out what else I needed to do.
For a while I felt like I was going around in circles, so I thought I would create a quick roadmap.
TO START: Create an account. Substack will guide you through a few initial steps, then go to the My Account page by clicking on the Dropdown Arrow at the far right and select the last link, My Account, and you will be looking at the same page as shown below.
In the screenshot below, I’ve highlighted three navigation tools with red stars.
The Dropdown Arrow at the far right where you will find links to About, Archive, Help, and My Account.
The Dashboard button.
The View Profile button.
My Account

The Dashboard
On your Dashboard, you’ll find a list of your posts, the ability to create new posts, some Resources/Tutorials. At the right, the Resources link, Setting Up Your Substack, shows you how to create an individual post, such as making text bold, adding links, inserting graphics, etc.
The new Navigation Bar that appears across the top includes:
Posts
Subscribers
Stats
Settings
Review this section to make your Substack look professional and function well.
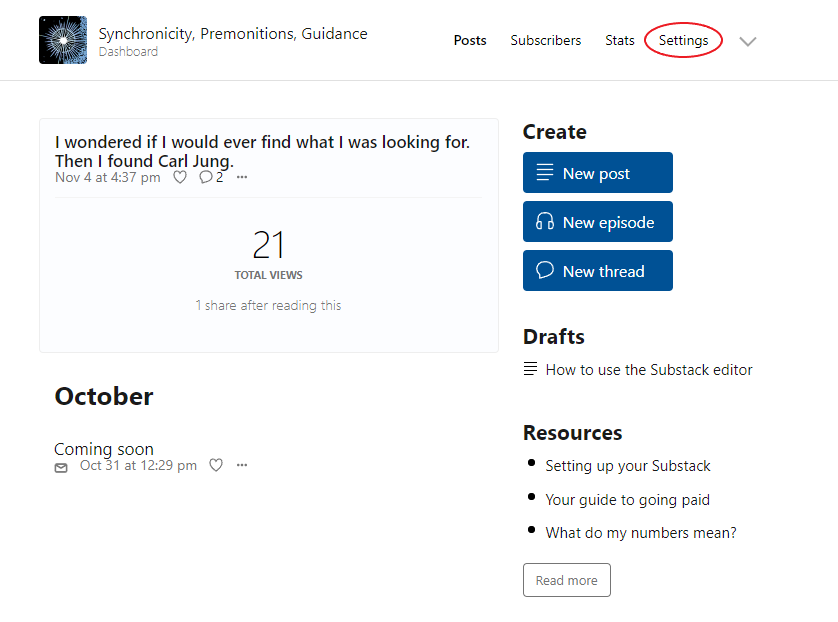
Settings
You will need to decide on Tags, edit your About page, and create a couple of graphics:
Logo that appears at the upper left side of your posts and on your shared posts if you don’t include a photo.
About Page image.
You will also need to choose a Theme color. Sometimes using a custom Hex code (#000000), that coordinates well with the rest of your artwork, adds a level of professionalism.


The rest of the options are self-explanatory (although I did have to add the .csv tag to my exported mailing list to get it to import).
Note: To get back to your Dashboard, click Your Publication Title/Dashboard link at the top left. It will take you to an alternate view of your posts, then select the Dashboard button at the far right.
View Profile
Go back to your My Account page to update your Profile information if you want to change what may have been imported depending on how you initially set up your Substack. I set up via Twitter, so it imported that profile info.
You will also see three important links across the top:
Readers which allows you to discover other publications either via the Search bar or the drop down menu, as well as a Reader view of the publications you’ve subscribed to,
Writers which offers writers other options such as the ability to create Podcasts right in Substack, and
Resources which includes free tutorials on how to grow, information on getting paid, and more.
If these links disappear when you come back from the Reader, click on the orange Flag icon at the top left, and you should see some familiar navigation tools to get you back where you need to go.

Getting Paid
I really like the fact that readers can access my writing at different levels in separate sections. I had a publication called Synchronicity, Documented, that was free on my blog, and with Substack, it will continue to be.
It seems like readers need more information about what happens when you initially select the Subscribe button. The screenshot below shows what the interface looks like when you set up the paid support options.

I hope this helps! I’ve edited this a little after I’ve navigated around a bit and was asked a couple of questions.
Note: When you’re in the Reader, click on either the name or image in the upper left for the dropdown menu and select Profile. If you don’t see the Navigation Bar on the Profile page, click on the orange flag in the upper left.
Please feel free to let me know if you have any questions or suggestions.